Implement routes in our Angular application
Routing is the process of navigation from once place to another. Angular simplifies routing in a way that it provides control bind through routerLink via registered routes.
In the following example, we will follow below steps to achieve a simple routing:
- Create a new file Routing.ts
- Define Routes.
- Create HTML controls in the app.component.html
- Bind the controls with the routes using the routerLink
The following is the project structure. Created a new folder Routes and created Routing.ts and write the below code to register the routes.
Imports: components and required assemblies are imported.
MyRoute: This is the route config. I defined 4 routes, path with * refer to all other components, Illinois will refer to IllinoisComponent, NewYork will refer to NewYorkComponent, California will refer to CaliforniaComponent.
@NgModule directive will register the routing information. We have to provide the route config(MyRoute) to the decorator which will relay it to the calling controls through routerLink.
Routing.ts
import { NgModule } from '@angular/core';
import { Routes, RouterModule } from '@angular/router';
import { AppComponent } from 'src/app/app.component';

import { IllinoisComponent } from 'src/Illinois/IllinoisComponent';
import { NewYorkComponent } from 'src/NewYork/NewYorkComponent';
import { CaliforniaComponent } from 'src/California/CaliforniaComponent';

export const MyRoute =
[
    {path: '*', component: AppComponent},

    {path: 'Illinois', component: IllinoisComponent},
    {path: 'NewYork', component: NewYorkComponent},
    {path: 'California', component: CaliforniaComponent},

]
@NgModule({
  imports: [RouterModule.forRoot(MyRoute)],
  exports: [RouterModule]
})
export class AppRoutingModule { }
Now lets see the app.component.html
app.component.html
<table>
  <tr>
    <td>
      <div class="card card-small" role="main">
        <a [routerLink]="['/Illinois']"> Illinois </a>
      </div>
  </td>
  <td>
      <div class="card card-small" role="main">
        <a [routerLink]="['/NewYork']"> New York </a>
      </div>
  </td>
  <td>
    <div class="card card-small" role="main">
      <a [routerLink]="['/California']"> California </a>
    </div>
  </td>
  </tr>
  <tr>
    <td colspan="4">
        <div>
          <router-outlet>

          </router-outlet>
        </div>
    </td>
</tr>
</table>
So this is a simple html file and we have defined 3 href controls and have provided the router link.
For example, for link “Illinois”, the routerLink is ‘/Illinois’ which will read the registered route in our ‘MyRoute’ collection from Routing.ts and load the corresponding component.
Notice, the <router-outlet> in the below div. This is the container where our component will load based on the router link being called.
The code for the respective components and view are as belows:
IllinoisComponent.ts
import { Component } from '@angular/core';

@Component({
  templateUrl: './IllinoisView.html'
})

export class IllinoisComponent
{
}
IllinoisView.ts
<!-- Toolbar -->
<div>
    <img width="500" alt="No Img" src="../assets/WelcomeToChicago.PNG">
  </div>
NewYorkComponent.ts
import { Component } from '@angular/core';

@Component({
  templateUrl: './NewYorkView.html'
})

export class NewYorkComponent
{
}
NewYorkView.html
<!-- Toolbar -->
<div role="banner">
    <img src="../assets/NyCity.PNG">
</div>
CaliforniaComponent.ts
import { Component } from '@angular/core';

@Component({
  templateUrl: './CaliforniaView.html'
})

export class CaliforniaComponent
{
}
CaliforniaView.html
<!-- Toolbar -->
<div>
    <img width="500" alt="No Img" src="../assets/California.PNG">
  </div>
For instance, IllinoisComponent will be called when routerlink with ‘Illinois’ is triggered, NewYorkComponent will be called when routerLink with ‘NewYork’ is triggered and CaliforniaComponent will be called when routerLink with ‘California’ is triggered.
So, till here we defined the components and attached them with the views. The components are already registered in the MyRoute collection in Routing.ts file.
In the app.module.ts file we will import the route collection using the RouterModule. The AppComponent is defined in this module and the app.component is bind with app.component.html UI where our href controls with routerLink is present. The following is the code for app.module file. Please note that we must first link the route through its namespace, so we can use it under RouterModule.
app.module.ts
import { BrowserModule } from '@angular/platform-browser';
import { NgModule } from '@angular/core';
import { Routes, RouterModule } from '@angular/router';
import { MyRoute } from '../Routing/Routing';

import { AppComponent } from './app.component';

@NgModule({
  declarations: [
    AppComponent
    ],
  imports: [
    BrowserModule,
    RouterModule.forRoot(MyRoute),

  ],
  providers: [],
  bootstrap: [AppComponent]
})
export class AppModule { }
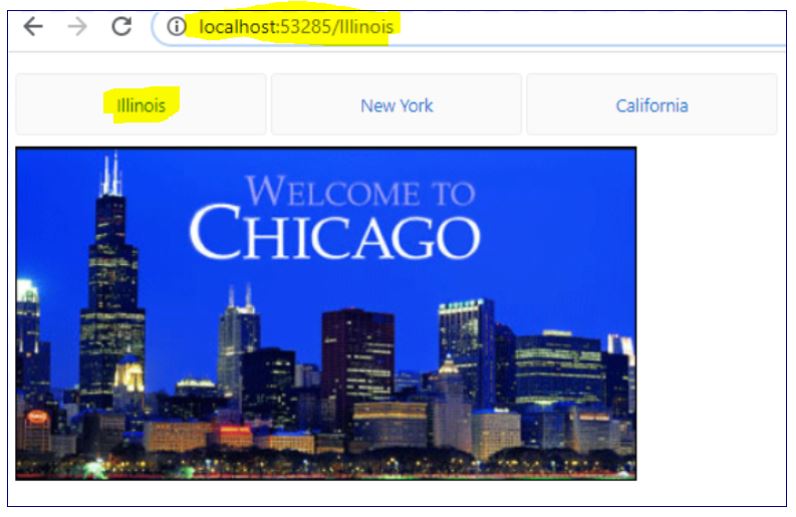
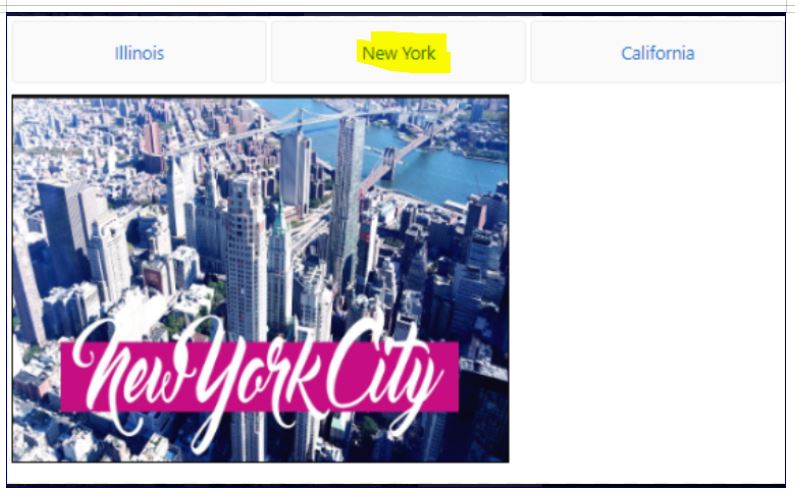
Now when we run the application we will see 3 links and click on each link will call their respective component and UI.
For example, if we click on tab ‘Illinois’ the router link with ‘/Illinois’ is called which will search for the name in the Route Config collection in MyRoute and called the respective IllinoisComponent which display the IllinoisView.html. Since we just have an image in the html so below is the UI for the same on the browser.

In the next chapter, we will take a look at how lazy loading works and what are the problems in the current example which gets resolved by Lazy Loading.
